Snagit Logo

Snagit

Supported by TRUYes
CostIndividual licenses may be available, otherwise licenses can be purchased for ~$80
PrivacyCompliant with FIPPA and institutional policies
BandwidthN/A, desktop application
EquipmentDesktop application; microphone and camera optional

What is Snagit?

Snagit is a screen-capture software used to create and edit screenshots and video recordings of your screen. You can choose to capture your entire screen, a window, or a specific region. Finished projects can be saved as images or video files, or shared directly to platforms such as Camtasia, PowerPoint, and YouTube.

What Can You Use it For?

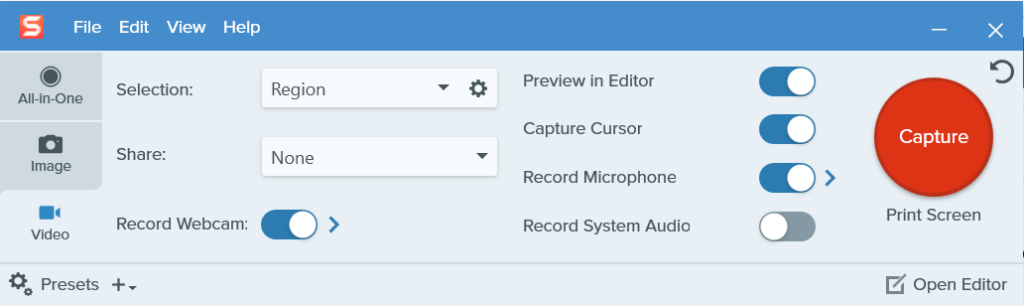
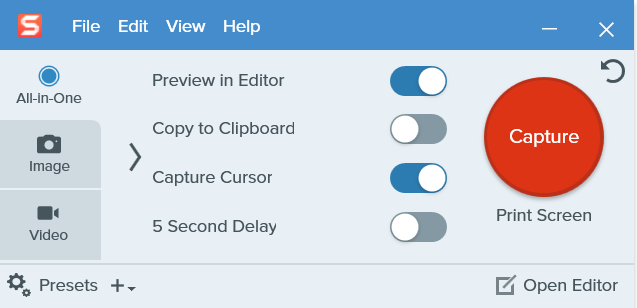
Snagit is best used to create visual, annotated instructions, or to quickly record explainer videos. There are three capture options when Snagit is launched from your desktop: image, video, and all-in-one. The editor can be accessed at any time from the capture screen, and will automatically launch once your capture is complete:

Snagit’s greatest strength is in its image capture and annotation capabilities. A variety of options are provided for capturing images on your screen, such as capturing full screen, a particular window, or a particular region which includes a handy crosshairs function to ensure you are cropping the exact area or edge you are intending to.

Image Capture

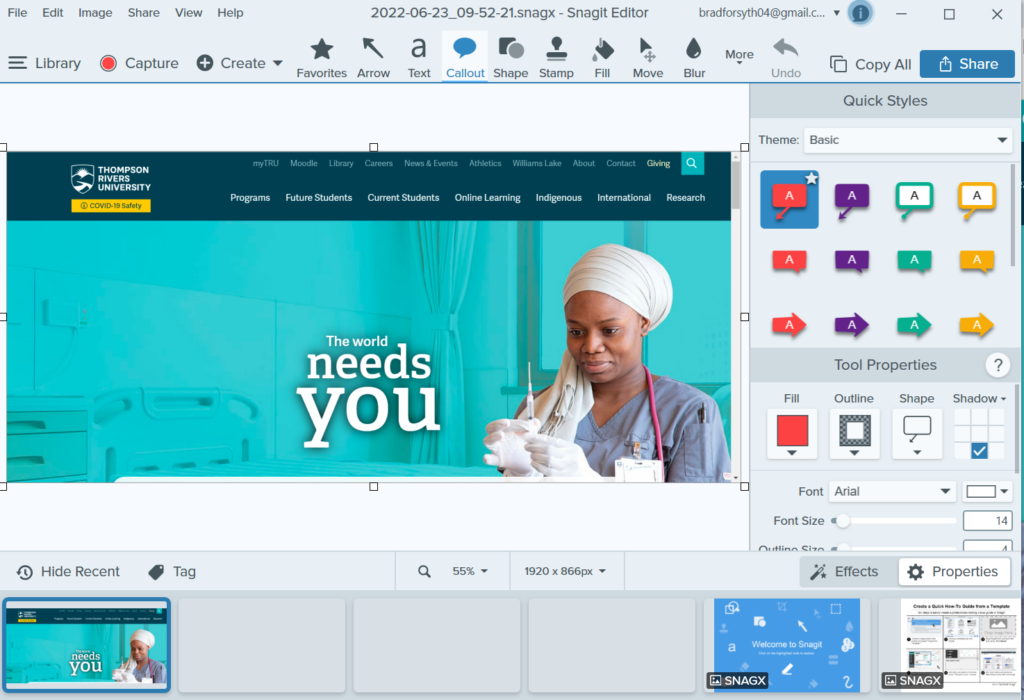
Snagit’s editor has a robust offering of features for editing images, including the ability to crop, blur, simplify, magnify, and erase. It also has a robust offering of features for annotation, including the ability to add arrows, shapes, text, callouts, numbered steps, shapes, highlights, and more. You can also combine images and expand the canvas space to make more room for annotations. Each of these features also include customization options.

Image Editor

Snagit also provides the ability to quickly capture video recordings of your screen, including the options to also record through your webcam and your microphone and/or system audio. Like Snagit’s image capture function, you can choose to capture an entire window or a particular region of your screen.

Video Capture

Snagit’s video editing features are very limited, but can be exported in a variety of formats, including GIFs. For video capture, we recommend using Kaltura for its more robust editing and accessibility features and its integration within Moodle, or Camtasia if you are looking for even more options for editing your videos.

Video Editor

Snagit’s all-in-one capture option allows you to quickly capture your screen and decide if you would like your capture to be an image, a video, or a panoramic scrolling image that can capture any scrolling area, horizontally or vertically.

All-in-One Capture

How Can You Access it?

Snagit is a desktop application. License keys may be available on a case-by-case basis. Contact IT Services for further information.

License keys can also be purchased online from TechSmith, as well as access to a free 15-day trial. Refer to Snagit’s system requirements here.

How Do You Use it?

Follow the steps below to learn how to capture and edit in Snagit. Additional tutorials are available through the TechSmith Webinar Library.

Capturing Your Screen

TechSmith Snagit: Quickly Capture Your Screen [Video]. YouTube. https://www.youtube.com/watch?v=6jmxRRhl_8k
  1. Open Snagit. On Windows, you will see the Capture window with the big red button. On Mac, you will need to click Capture from the menu at top left to launch the Capture window.
  2. Set up the content that you want to capture on your screen.
  3. In the Capture window, select Image from the options on the left-hand side.
  4. Use the toggle buttons to specify which image capture settings you want active while taking the capture.
  5. Click the Capture button.
  6. If needed, select the screen area of your capture by clicking and dragging the orange crosshairs or moving the area of your selection.
  7. Once taken, your capture will open in the Snagit Editor. You can follow the directions below for help with editing and saving.
  1. Open Snagit. On Windows, you will see the Capture window with the big red button. On Mac, you will need to click Capture from the menu at top left to launch the Capture window.
  2. Set up the content that you want to record on your screen.
  3. In the Capture window, select Video from the options on the left-hand side.
  4. Use the toggle buttons to specify which video capture settings you want active while recording.
  5. Click the Capture button.
  6. If needed, select the area to record on your screen by clicking and dragging the orange crosshairs or moving the area of your selection.
  7. In the Video Recording toolbar that appears, options can be turned on or off before you record:
    • Webcam – Record live video from your webcam (either built-in or connected). Click the down arrow to choose between the picture-in-picture or full screen for your webcam.
    • System Audio – Record the sound or audio playing from your computer.
    • Microphone Audio – Record the audio from your computer’s microphone (either built-in or connected).
  8. When you are ready, click Record.
  9. If wanting to pause your recording at any point, click Pause.
  10. Click Stop to finish your recording. Your capture will open in the Snagit Editor. You can follow the directions below for help with editing and saving.
  • For detailed descriptions of the capture options, review Snagit’s guide to common captures. You can learn about capturing hidden windows, capturing multiple sections at the same time, and more.
  • You can apply common capture settings or create your own by saving Snagit capture presets. To see and add presets, click “Presets” at the bottom left of the Capture window.
  • Creating Snagit videos from images is another way to create content, allowing you to emphasize parts of an image or a series of images as you explain a process or concept, or provide feedback to students.

Edit Your Captures

TechSmith Snagit: Edit Screenshots [Video]. YouTube. https://www.youtube.com/watch?v=9qshC9eQuAg
  1. After taking an image capture or opening an image file in Snagit, your capture will appear in the canvas area of Snagit Editor.
  2. Select the tool you want to use from the toolbar at the top. You can access additional tools by clicking More.
  3. Alter and customize the settings of any particular tool through the Tool Properties panel on the lower right.
  4. Click the Image menu at the top of the window to access additional editing features for trimming, resizing, and rotating your capture.
  5. Once you are done editing, click File and select Save to save your image.
  1. After recording a video capture or opening a video file in Snagit, your recording will appear in Snagit Editor.
  2. The Snagit video playback controls will pop up at the bottom. These controls allow for editing your video in two ways:
    • Trimming or Cutting Unwanted Sections – Click and drag the Start (green) or End (red) handle to highlight the area you want to cut in blue. Click Cut to delete the segment. After being cut, the segment will be shown as a yellow line on the timeline.
    • Saving a Frame as an Image – Drag the playhead (white arrow) to display the video frame that you want to save. Click Save Frame as PNG to open the frame as an image capture, which you can edit or save.
  3. Once you are done editing, click File and select Save As to save your recording as a video (.mp4) or animated GIF image (.gif).
    • You can Share your video to a variety of platforms, such as Camtasia or YouTube.
  • You can save your image captures as projects to edit them again at a later time. When saving the image, select Snagit Project File Type (.snag or .snagproj) as your file format.
  • Explore the Snagit Editor toolbar guide for more about the available tools for editing and marking up your image captures.
  • Adding tags in your library to your captures can help you group and organize your files, e.g., under particular topics or course names. To add a tag, open your capture in Snagit Editor and click “Tag” at the bottom left.

This section was adapted from the University of British Columbia Learning Technology Hub Snagit Instructor Guide under a Creative Commons Attribution 4.0 International License.

What Support is Available?

Please contact us at learningtech@tru.ca if you have any questions! You can also visit TechSmith Support for additional tutorials, troubleshooting, and assistance if you purchased your own license key.

Leave a Reply

Your email address will not be published. Required fields are marked *