Introduction
This guide will outline how to create effective educational videos, including what technology will be needed, relevant teaching and learning theories, and a step-by-step guide outlining best practices.
Why Video?
Video has numerous benefits for learning by taking advantage of both the visual and auditory channels. Videos can be organized into more easily digestible chunks and provide students with the flexibility to choose when to watch, what to watch, and the ability to re-watch. They should also provide students the option to read the video transcript or closed captioning. Students can then come to class prepared to discuss and apply what they have learned.
Videos can be time-intensive to plan, record, and edit, but they do not need to be limited to instructor-created content videos. Consider using asynchronous videos to add teacher presence outside of the classroom or have students be the creators!
Lownthal and colleagues (2012) provide examples of the wide variety of potential uses of videos:
Technology Requirements
Hardware Requirements
There is a common misconception that producing videos requires expensive equipment. In fact, you likely already have a computer or smartphone that will allow you to produce and edit videos of good quality. The following is a list of equipment you may need to create your own video.
Software Requirements
There are a number of video and audio editing software available.
TRU supports the following:
Camtasia
Camtasia is a video capture and editing software used to create audio and visual multimedia. Licenses may be available through IT Services.
You can find royalty-free and creative commons licensed images and audio clips at the following sites:
How Does Theory Support the Use of Video?
Cognitive Load Theory
Cognitive Load Theory, originally articulated by Sweller and colleagues (1988, 1989, 1994), postulates that memory has three primary components. Sensory memory refers to transient information collected from the environment. This information can be selected for temporary storage in working memory, which has a very limited capacity. Information stored in the working memory is a prerequisite for encoding into long-term memory.
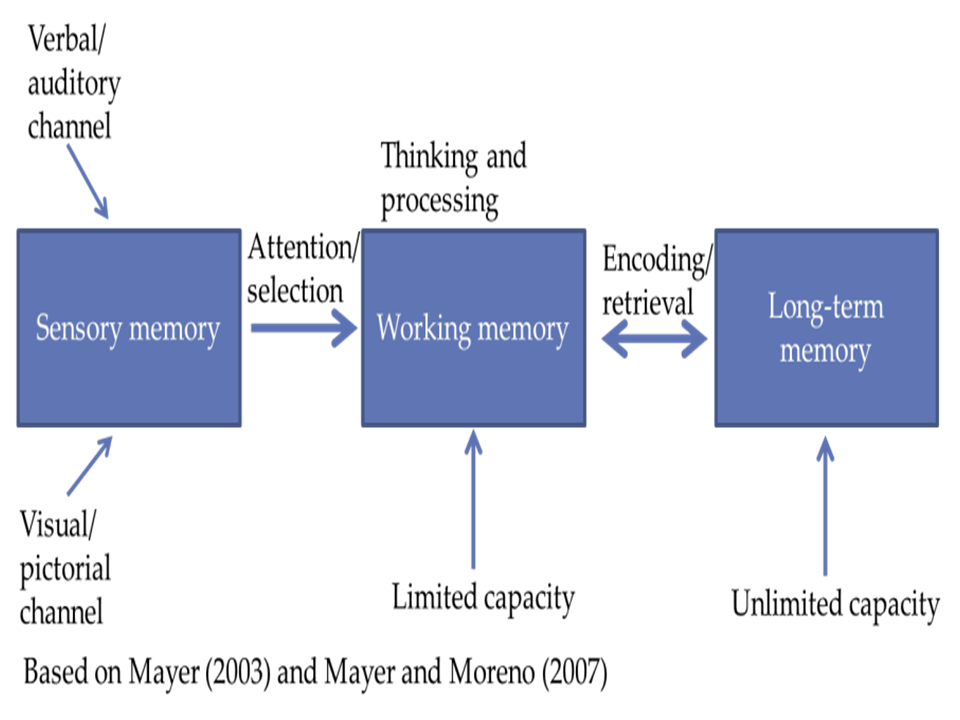
Cognitive Load Theory describes three types of cognitive load present in learning experiences:
- Extraneous Load: refers to unnecessary and distracting information
- Intrinsic Load: refers to the inherent complexity of new material
- Germane Load: refers to linking new information with current information
How our minds process and store information is an important consideration when creating educational videos. Because learners’ working memory has a limited capacity and is essential to processing information to be stored in long-term memory, it is crucial to try to reduce cognitive load and prompt the processing of only the most relevant information.
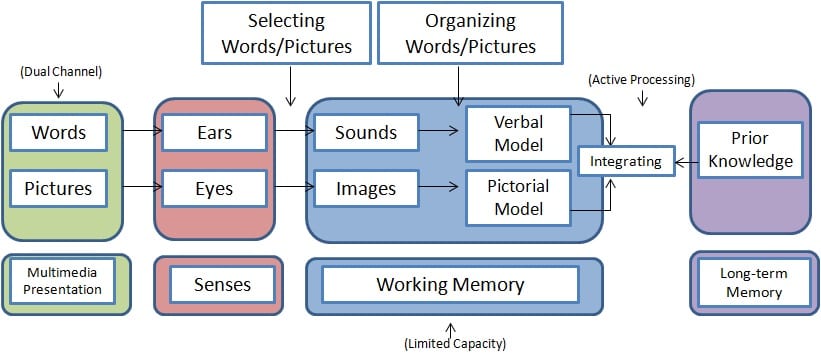
Cognitive Theory of Multimedia Learning
The Cognitive Theory of Multimedia Learning, building on Cognitive Load Theory, describes working memory as having two channels – visual and auditory – which, when utilized together, maximize the working memory’s capacity (Mayer and Moreno, 2003). However, managing the limited cognitive load of each channel effectively requires effective design strategies. Learning is an active process of filtering, selecting, organizing, and integrating information (Mayer, 2009).
Tips
The following recommendations will assist you to minimize extraneous cognitive load, manage intrinsic cognitive load, and optimize germane cognitive load. These recommendations draw on Mayer’s (2009) 12 Principles of Multimedia Learning. Refer to our Multimedia Design Guide for more information on the principles.
Promoting Engagement
Keep it short. Segment your videos into chunks of 6 minutes or less. This will help promote cognitive processing and engagement in learners, and allow you to create quick, concept-specific videos that can be placed in different areas in your course. Refer to our guide on splitting media into two pieces using Kaltura. If your video cannot be broken into smaller pieces, try adding time stamps so learners can more easily navigate. Additionally, ensure the visual and auditory channels are used in complementary ways. For example, people learn better from graphics and narrations than from animation and on-screen text.
Keep it simple. Utilize highlighting or annotations to signal key concepts and connection to learners. Remove extraneous information that is not relevant to the learning outcomes. This might also include removing background music or decorative images. Remove redundant information. For example, people learn better from graphics and narration than from graphics, narration and on-screen text.
Keep it real. Be yourself! Student engagement increases when instructors make the videos feel more personal and authentic by speaking conversationally and with enthusiasm. If possible, address your targeted student group. “Talking head” videos can be a nice way to add a further personal touch to your video. Keep in mind, however, that it may prove to be a distraction from other content presented in the video. Consider only having yourself appear in the beginning of the video, or reserving recording yourself for quick check-in or introductory videos.
Keep it relevant. Help situate students at the beginning of your video. What do they already need to know? What is this video going to cover? Ensure that the video is directly tied to the course learning outcomes or a particular assessment so students place value on it. Asynchronous videos do not enable direct interaction between viewers and the video creator, so try your best to anticipate possible questions, provide real-world examples, and avoid wordiness.
Promoting Active Learning:
Include guiding questions. Providing students guiding questions and encouraging them to actively note their answers has been shown to increase engagement and improve content retention (Lawson et. al., 2006).
Include formative assessment checks. Including quick formative assessment checks can help students self-regulate their learning. Refer to our guide on adding multiple choice questions within your video using the Kaltura Quiz tool.
Include features that give students control. Ensure that you have provided students with the opportunity to pause and control the movement of the video so they can review important sections. It is also helpful to include chapter headings or time stamps so students can quickly revisit a particular topic. Adding captions improves accessibility and provides an alternative to viewing the video in its entirety. Refer to our guides on using PowerPoint to add bookmarks to your video and adding transcripts or captions in Kaltura.
Include drawings or animations. Including drawings or animations can keep students more engaged than static PowerPoint slides. Consider using tools like a digital whiteboard, a lightboard, or animation software such as VideoScribe, to make your videos more engaging by actively working through problems.
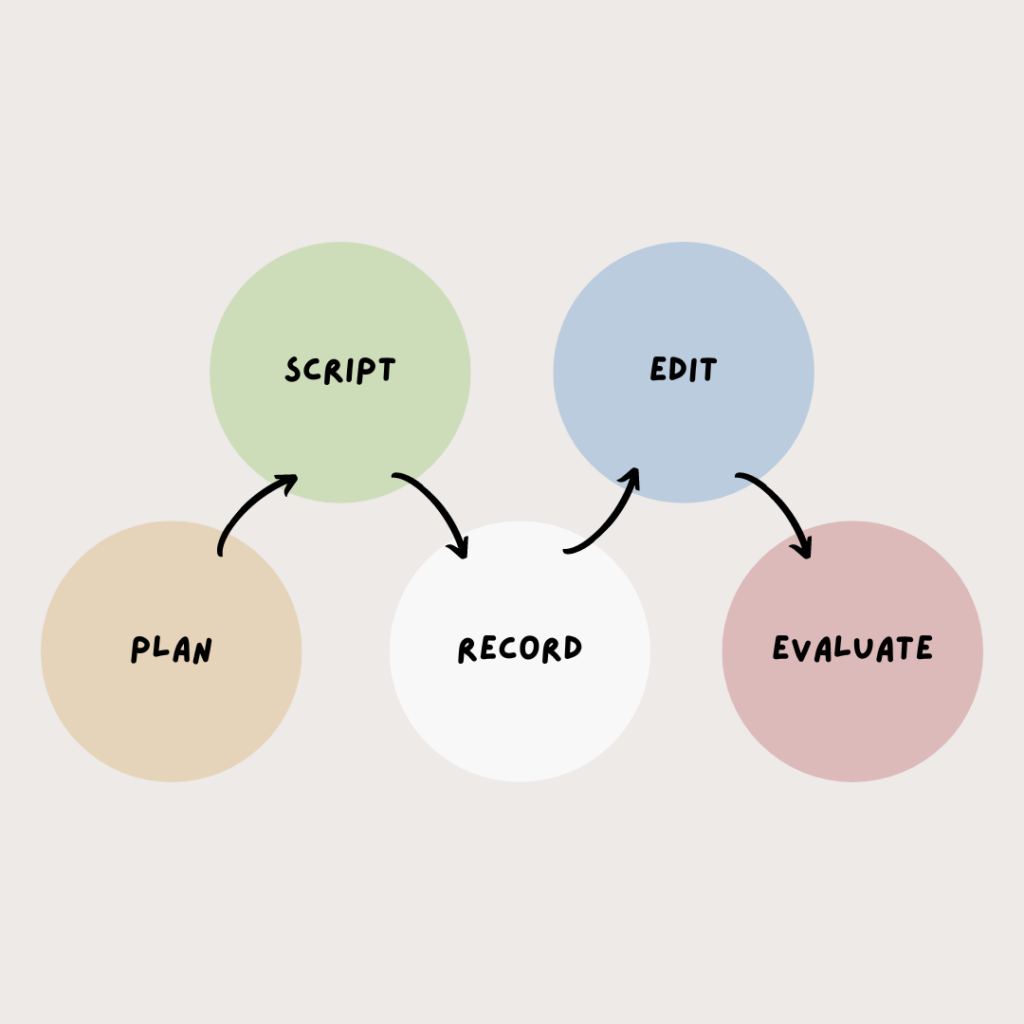
Creating Your Video
When designing a video for your course, it’s a good idea to follow a step by step process to ensure organization, efficiency and effectiveness. These steps include:
- Plan
- Script
- Record
- Edit
- Evaluate
Think of this as an iterative process rather than sequential.
Determine your goals and what you want to achieve with your video. It’s important to consider how your video will align with your course and learning outcomes. Will it enhance the learning experience? Is video the best option? What is the purpose of the video – to introduce new concepts or reinforce concepts that have already been introduced?
Map out a plan for your video including who it’s intended for, what topic it will cover, how it might be used, what tone it will have, where it will be published…etc. It’s important to give structure to your video, deciding what content you will cover in the start, middle and ending.
Finally, once you’ve determined your plan, you can then choose which format of video you would like to use. There are many interesting ways you may choose to relay information to your learners. The versatility of using video in education is quite endless. Depending on your learning outcomes, content/course subject or taste, you may choose a video format that is most suitable to your needs. Needs may include explaining a concept, introductions (you, your TA’s, students, course, assignment etc.), demos/simulations, pre-lecture content, interviewing an expert, delivering feedback or student-generated videos.
Below you will find examples of just some of the numerous different types of video formats:
Now that you have determined an initial concept for your video, you can begin the pre-production stage where you will determine how you will proceed with creating your video.
First, consider writing a script or outline – what will you say? Though it may seem like some video content is improvised, most people have either a well-established script or an outline of key talking points before they record. Though it’s not essential to prepare and even record your audio before the visual graphics, it can really help when it comes to achieving synchronization of visual and audio during the editing phase. The timing of visuals are much easier to tweak than recorded audio.
Once you’ve written your script, you should consider what visuals you want to use. Will you be using only a video recording? Will you include annotations or text? Will you use graphics or images? You may want to curate content rather than create content. If it exists, there’s no need to reinvent the wheel. Just make sure you are aware of copyright considerations.
To script or not to script?
Creating a script can help plan and organize your content; however, there are pros and cons to creating detailed scripts:
Pros:
- allow deliberate word choice,
- simplify editing
Cons:
- can be time consuming,
- may not sound natural,
- can be difficult to read and demo during your video simultaneously.
Consider scripting your opening and closing statements and outlining the rest of your video to sound more natural. Refer to Columbia University’s Script Writing Recommended Practices.
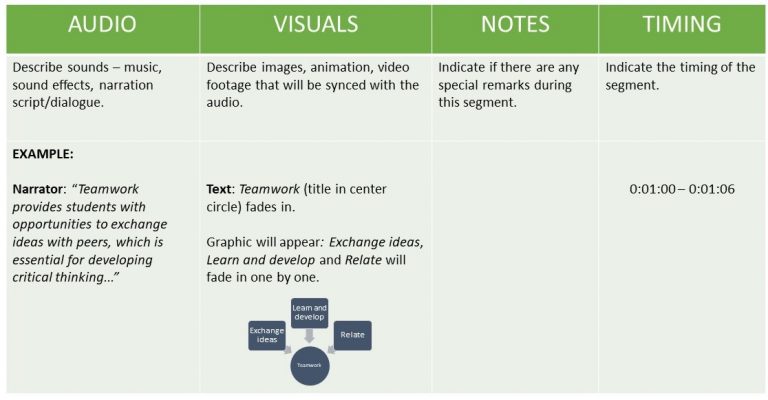
An alternative or additional option to creating a script is to create a storyboard. A storyboard is a way to organize your content – visual, text, and audio elements – and their sequence in your video. A storyboard can be created in Microsoft Word or PowerPoint, and does not need to be complex; it is meant to serve as the basic game plan and help organize the structure and flow of your video. An example of a storyboard table can be seen in the figure below.
Lights, camera, action! The third step is to record! It’s time to put your plan into action and create your video.
Before creating your video, you must select and prepare:
- Equipment (camera, lighting, microphone)
- Software (video/audio editing)
- Location (studio, on-site, lab, office desk)
Looking for a quiet place to record?
The TRU Library Makerspace Recording Studio features noise-dampening panels and all the equipment you need to record. Room reservations are booked in one hour intervals.
Contact us at learningtech@tru.ca if you are interested in booking a lightboard session!
Here are a few tips for the recording process:
Once you’ve captured what you need, you can move on to the editing process. During this step, you will be combining all of your materials including the intro, visuals, audio, credits, references, special effects…etc. This is where you will make cuts, move things around, sync your audio and visuals and add annotations. Be patient! This step may take some time, depending on your project.
When you have finished editing and before you publish your work, you can use the following checklist to help you evaluate if you have incorporated the key design principles that have been discussed in this guide. This self-assessment will help you identify the strengths and weaknesses in your video in order to improve your final product.
Keep it Short:
☐ The video is of a reasonable length, ~ 6-8 minutes
☐ Visual and auditory channels are being used in complimentary ways
Keep it Simple:
☐ Key concepts are highlighted and/or annotated
☐ Extraneous information, such as background music or decorative images have been used sparingly
☐ Redundant information has been removed
Keep it Real:
☐ You demonstrate enthusiasm for the content and speak in a conversational tone
☐ You engage the students by asking them leading questions or reflections
☐ The video is appropriate for your target audience
Keep it Relevant:
☐ Viewers are appropriately situated as to what previous knowledge is required and what the video will cover
☐ The video is aligned with learning and assessment outcomes
☐ The selected video format is appropriate to support the content and learning objectives
Additional Resources
Teaching With Video – Act 1
Teaching With Video – Act 2
References
Brame, C.J. (2015). Effective education videos. Retrieved May 9, 2022 from http://cft.vanderbilt.edu/guides-sub-pages/effective-educational-videos/.
Lawson, T. J., Bodle, J. H., Houlette, M. A., & Haubner, R. R. (2006). Guiding questions enhance student learning from educational videos. Teaching of Psychology, 33(1), 31-33. https://doi.org/10.1207/s15328023top3301_7
Mayer, R.E and Moreno, R. (2003). Nine ways to reduce cognitive load in multimedia learning. Educational Psychologist 38, 43-52.