Introduction
Video has numerous benefits for learning by taking advantage of both the visual and auditory channels. This guide will outline how to create effective educational videos, including what technology will be needed, relevant teaching and learning theories, and a step-by-step guide outlining best practices. Although this guide is primarily aimed at asynchronous delivery of educational videos, a brief discussion of synchronous video delivery is included as well.
Synchronous or Asynchronous?
The sudden shift to virtual delivery at the onset of the Covid-19 pandemic resulted in many instructors delivering lectures on synchronous video platforms such as BigBlueButton or Zoom. You may have even continued to deliver some classes virtually following the return to campus, shifting your teaching practice to more of a blended or “flipped” approach. What are the pros and cons of synchronous and asynchronous videos?
Synchronous videos can be beneficial in that they can help clarify concepts, and provide immediacy and social interaction, such as through the use of breakout rooms. It can also be useful for recording in-class sessions to be made accessible online afterwards or for live-streaming to students online.
That said, synchronous videos can also be problematic. They may cause undue stress for students who are uncomfortable being on camera if they do not have appropriate study spaces. It may also reduce access for students lacking the necessary hardware or internet access, or for those who cannot attend synchronous sessions due to family and time commitments. Synchronous video sessions also tend to be too long, leading to Zoom fatigue and raises issues concerning the Zoom gaze.
Asynchronous videos, on the other hand, can be organized into more easily digestible chunks. They provide students with the flexibility to choose when to watch, what to watch, and the ability to re-watch. They should also provide students the ability to read the video transcript or closed captioning. Students can then come to class prepared to discuss and apply what they have learned.
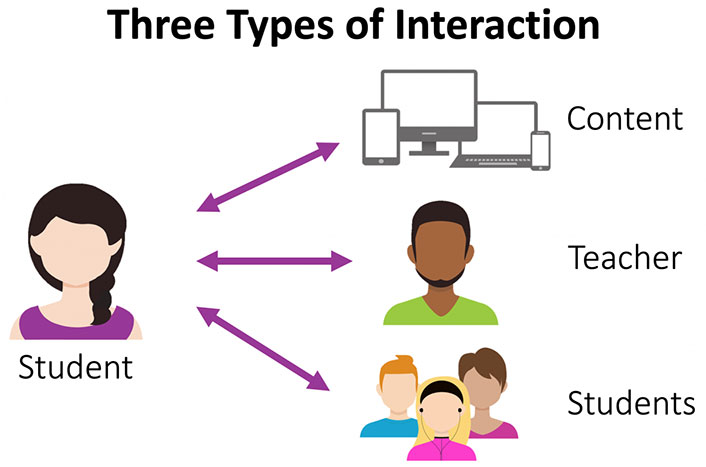
Asynchronous videos can be time-intensive to plan, record, and edit, but they do not need to be limited to instructor-created content videos. Consider using asynchronous videos to add teacher presence outside of the classroom or have students be creators in order to touch on all three interaction types:
Lownthal and colleagues (2012) provide examples of the wide variety of potential uses of asynchronous videos other than content delivery:
- Present questions to a class for students to discuss
- Give feedback on an assignment
- Check in on students doing internships or experiential projects
- Have students provide a quick update on their progress on a project
- Conduct an asynchronous review session for a quiz where students ask questions via video and the instructor responds via video for everyone to see
- Provide tutorials or screencast demonstrations of concepts or procedures
- Conduct brainstorming or ideation sessions, given that asynchronous video allows more time for people to compose their thoughts, reducing the likelihood of groupthink
- Improve student advising and mentoring through weekly or biweekly updates
- Improve alumni outreach by asking alumni to record quick video summaries of their work in a discipline or answers to student questions
- Increase consensus development on a team by asking each team member to share their independent thoughts on an issue
- Enable collaboration across countries and time zones
- Facilitate listening to diverse narratives around a social issue, collected separately but available for students to view and discuss
- Hold “water cooler” chit-chat discussions, given that apps such as Marco Polo and TikTok have already created a rising generation of students who interact casually through video in the same way their parents interacted through letter writing or email
Asynchronous Video Discussions
Asynchronous video discussions places students in the role of content creator. Substituting video for text discussions helps imitate social presence and reveals emotion, tone, and facial expressions which are often lost in the standard discussion forum, while maintaining the flexibility of having time to critically reflect before responding and choosing when to engage. Video discussions can be used for ice-breaker activities, back-and-forth discussions, posting critical reflections or responses, or debates. Like their written counterparts, however, they still require well conceived discussion prompts and instructor facilitation. Recording themselves can be uncomfortable for students at first, but research has shown that discomfort lessens after just a few times (Borup et. al., 2012).
Jered Borup (2021) recommends asking the following questions:
If you answer “yes” to any of these questions, then the use of asynchronous video would be beneficial:
- In part, are you assessing students’ ability to speak or present on the topic?
- Are you hoping that this discussion will help establish a sense of community?
- Is it important for you to know how students feel about the topic?
- Do some students in your course have difficulty communicating in text?
If you answer “yes” to any of these questions, then the use of asynchronous text would be beneficial:
- In part, are you assessing students’ ability to write on the topic?
- Are you primarily assessing students’ critical thinking on the topic?
- Is a written record necessary for future review?
- Do some students in your course have difficulty communicating using video or viewing/hearing video?
It’s likely that you responded “yes” to questions in both lists. When that’s the case, you may want to create activities that combine text with video comments or provide students the choice of which modality they use to comment.
© 2021 Jered Borup. The text of this work is licensed under a Creative Commons BY-SA 4.0 International License.
Technology Requirements
Hardware Requirements
There is a common misconception that producing videos requires expensive equipment. In fact, you likely already have a computer or smartphone that will allow you to produce and edit videos of good quality. The following is a list of equipment you may need to create your own video.
The TRU Library Makerspace Recording Studio features noise-dampening panels and all the equipment you need to record. Room reservations are booked in one hour intervals.
Software Requirements
There are a number of video and audio editing software available.
TRU supports the following:
Other software that you may want to consider:
You can find royalty-free and creative commons licensed images and audio clips at the following sites:
Teaching and Learning Theories
Cognitive Load Theory
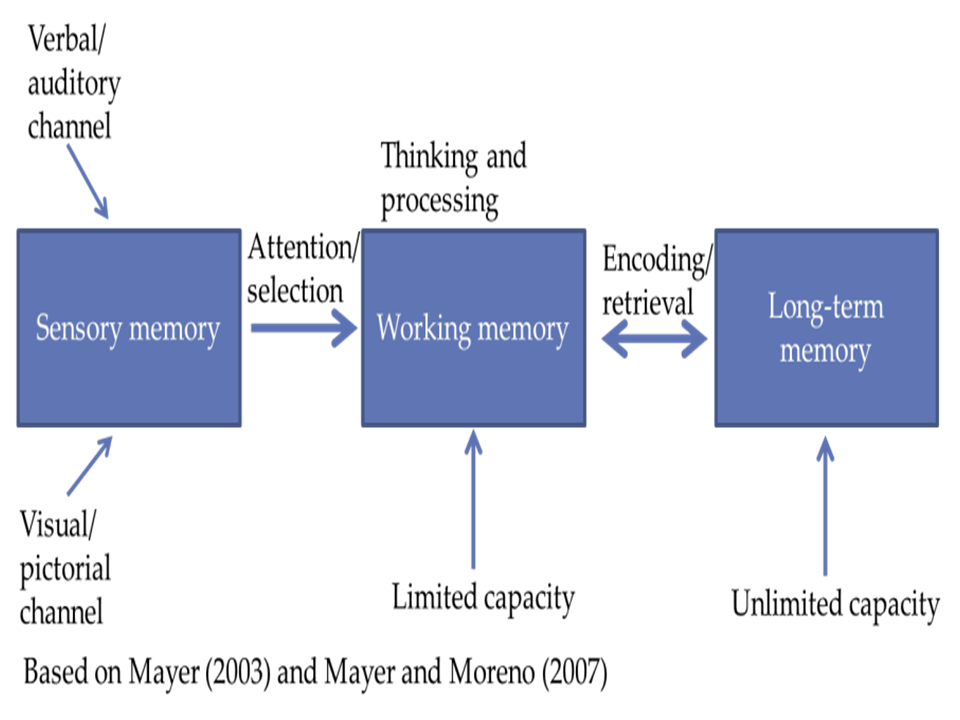
Cognitive Load Theory, originally articulated by Sweller and colleagues (1988, 1989, 1994), postulates that memory has three primary components. Sensory memory refers to transient information collected from the environment. This information can be selected for temporary storage in working memory, which has a very limited capacity. Information stored in the working memory is a prerequisite for encoding into long-term memory.
Cognitive Load Theory describes three types of cognitive load present in learning experiences:
- Extraneous Load: refers to unnecessary and distracting information
- Intrinsic Load: refers to the inherent complexity of new material
- Germane Load: refers to linking new information with current information
How our minds process and store information is an important consideration when creating educational videos. Because learners’ working memory has a limited capacity and is essential to processing information to be stored in long-term memory, it is crucial to try to reduce cognitive load and prompt the processing of only the most relevant information.
Cognitive Theory of Multimedia Learning
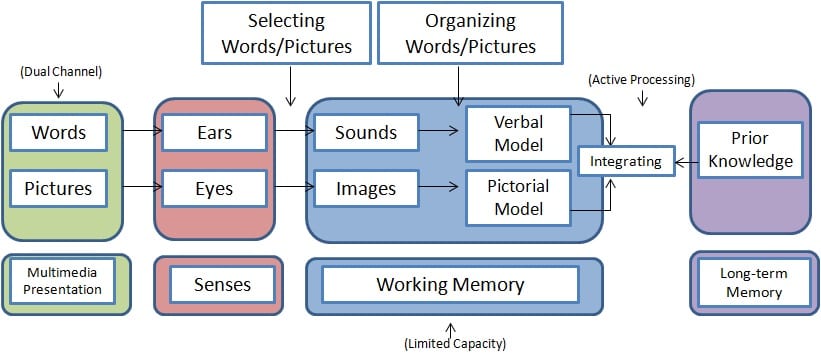
The Cognitive Theory of Multimedia Learning, building on Cognitive Load Theory, describes working memory as having two channels – visual and auditory – which, when utilized together, maximize the working memory’s capacity (Mayer and Moreno, 2003). However, managing the limited cognitive load of each channel effectively requires effective design strategies. Learning is an active process of filtering, selecting, organizing, and integrating information (Mayer, 2009).
The following recommendations will assist you to minimize extraneous cognitive load, manage intrinsic cognitive load, and optimize germane cognitive load. These recommendations draw on Mayer’s (2009) 12 Principles of Multimedia Learning. Refer to our Multimedia Design Guide for more information on the principles.
- Segmenting refers to breaking down content to smaller, more easily digested chunks. Educational videos are more effective and are better at holding learners’ attention when they are approximately 6 minutes or shorter. This helps manage intrinsic load, as well as the germane load by managing the structure of the information presented. Rather than having one long video, try breaking it down to several shorter videos. If this is not possible or efficient, try adding time stamps to your video so learners can mentally break down the content and more easily navigate the video.
- Signalling refers to the use of on-screen text or symbols to highlight important information. For example, you may use key words, highlights, or annotations. By doing so, you direct learners’ attention to elements of the video that are critical for processing in the working memory. This reduces extraneous load while also potentially increasing germane load by highlighting connections within the information.
- Weeding refers to eliminating extraneous information that is not directly relevant to the learning goal. For example, this may include background music, decorative images, or information that is not relevant. What information is relevant may depend on the learner and their previous knowledge.
- Matching modality refers to the use of both the visual and audio channels to convey information, and fitting the type of information to the most appropriate channel. For example, showing an animation of a process on screen while narrating it uses both channels to elucidate the process, thus giving the learner dual and complementary streams of information to highlight features that should be processed in working memory. In contrast, showing the animation while also showing printed text uses only the visual channel and thus overloads this channel and impedes learning (Mayer and Moreno, 2003). Utilizing both the visual and auditory channels in a appropriate and complimentary way has been shown to increase students’ retention and ability to transfer information (Mayer and Moreno, 2003) and to increase student engagement with videos (Thomson et al., 2014; Guo et al., 2014).
(Adapted from Brame, 2015)
Promoting Engagement:
Keep it short. As noted above, segment your videos into chunks of 6 minutes or less. This will help promote cognitive processing and engagement in learners, and allow you to create quick, concept-specific videos that can be placed in different areas in your course. Refer to our guide on splitting media into two pieces using Kaltura.
Keep it simple. Utilize highlighting or annotations to signal key concepts to learners. Remove extraneous information that is not relevant to the learning outcomes.
Keep it real. Be yourself! Student engagement increases when instructors make the videos feel more personal and authentic by speaking conversationally and with enthusiasm. If possible, address your targeted student group. “Talking head” videos can be a nice way to add a further personal touch to your video. Keep in mind, however, that it may prove to be a distraction from other content presented in the video. Consider only having yourself appear in the beginning of the video, or reserving recording yourself for quick check-in or introductory videos.
Keep it relevant. Help situate students at the beginning of your video. What do they already need to know? What is this video going to cover? Ensure that the video is directly tied to the course learning outcomes or a particular assessment so students place value on it. Asynchronous videos do not enable direct interaction between viewers and the video creator, so try your best to anticipate possible questions, provide real-world examples, and avoid wordiness.
Promoting Active Learning:
Include guiding questions. Providing students guiding questions and encouraging them to actively note their answers has been shown to increase engagement and improve content retention (Lawson et. al., 2006).
Include formative assessment checks. Including quick formative assessment checks can help students self-regulate their learning. Refer to our guide on adding multiple choice questions within your video using the Kaltura Quiz tool.
Include features that give students control. Ensure that you have provided students with the opportunity to pause and control the movement of the video so they can review important sections. It is also helpful to include chapter headings or time stamps so students can quickly revisit a particular topic. Adding captions improves accessibility and provides an alternative to viewing the video in its entirety.
Refer to our guides on using PowerPoint to add bookmarks to your video and adding transcripts or captions in Kaltura.
Include drawings or animations. Including drawings or animations can keep students more engaged than static PowerPoint slides. Consider using tools like a digital whiteboard, a lightboard, or animation software such as VideoScribe, to make your videos more engaging by actively working through problems.
Design Guide
Designing Your Video
When designing a video for your course, it’s a good idea to follow a step by step process to ensure organization, efficiency and effectiveness. To follow the steps in creating a video, you can follow the DOME method (Forsyth, Parent, Chiang, Pretorius, 2019)

Determine your goals and what you want to achieve with your video. It’s important to consider how your video will align with your course and learning outcomes. Will it enhance the learning experience? Is video the best option? What is the purpose of the video – to introduce new concepts or reinforce concepts that have already been introduced?
Map out a plan for your video including who it’s intended for, what topic it will cover, how it might be used, what tone it will have, where it will be published…etc. It’s important to give structure to your video, deciding what content you will cover in the start, middle and ending.
Finally, once you’ve determined your plan, you can then choose which format of video you would like to use. There are many interesting ways you may choose to relay information to your learners. The versatility of using video in education is quite endless. Formats of video design include, but are not limited to:
- Animation
- Interviews (conversation or face only)
- Pen cast
- Recorded lecture
- Role play
- Screencast
- Skills clips
- Stop motion
- Talking head (with green screen, in-classroom, with slides, or with text)
- Webcam capture
- Lightboard
- Synchronous or asynchronous video discussions
Depending on your learning outcomes, content/course subject or taste, you may choose a video format that is most suitable to your needs. Needs may include explaining a concept, introductions (you, your TA’s, students, course, assignment…etc), demos/simulations, pre-lecture content, interviewing an expert, delivering feedback or student-generated videos.
Now that you have determined an initial concept for your video, you can begin the pre-production stage where you will determine how you will proceed with creating your video.
First, you should write your script or outline – what will you say? Though it may seem like some video content is improvised, most people have a well-established script before they record. Though it’s not essential to prepare your audio before the visual graphics, it can really help when it comes to achieving synchronization of visual and audio during the editing phase. The timing of visuals are much easier to tweak than recorded audio.
Once you’ve originated your script, you should consider what visuals you want to use. Will you be using only a video recording? Will you include annotations or text? Will you use graphics or images? You may want to curate content rather than create content. If it exists, there’s no need to reinvent the wheel. Just make sure you are aware of copyright considerations.
Creating a script can help plan and organize your content; however, there are pros and cons to creating detailed scripts:
Pros:
- allow deliberate word choice,
- simplify editing
Cons:
- can be time consuming,
- may not sound natural,
- can be difficult to read and demo during your video simultaneously.
Consider scripting your opening and closing statements and outlining the rest of your video to sound more natural. Refer to Columbia University’s Script Writing Recommended Practices.
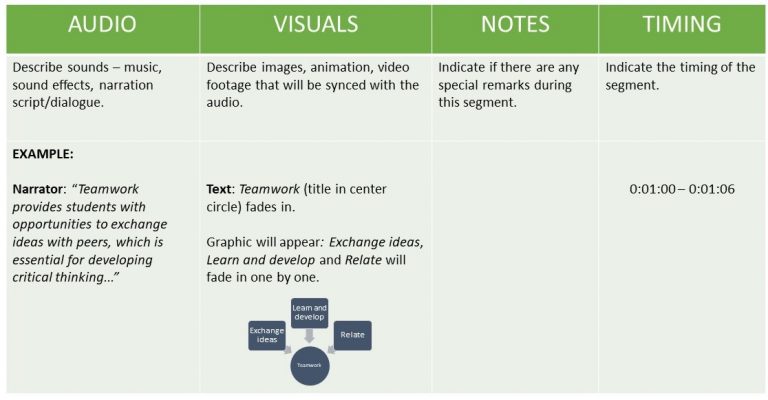
A key step to the pre-production phase is creating a storyboard. A storyboard is a way to organize your content – visual, text, and audio elements – and their sequence in your video. A storyboard can be created in Microsoft Word or PowerPoint, and does not need to be complex; it is meant to serve as the basic game plan and help organize the structure and flow of your video. An example of a storyboard table can be seen in the figure below.
Before creating your video, you must choose and prepare:
• Software (video/ audio editing)
• Equipment (camera, lighting, microphone)
• Location (studio, on-site, lab, office desk)
Lights, camera, action! The third step is the making step. It’s time to put your plan into action and create your video.
Here are a few tips for the recording process:
- Follow your storyboard/ script.
- Once you start recording, wait 3-5 seconds before you begin speaking.
- Rehearse! Try reading your script aloud a few times before recording to make sure it flows. Speak conversationally and with enthusiasm.
- Review in small batches as you go. If you make a mistake, pause for several seconds so it is easy to find the section later in the editing process. You can even make a note in your script where you left off.
- Be conscious of your lighting and any potential background noises that may be picked up by your microphone. This may include sounds from outside, your immediate environment, or your computer fan – don’t have your microphone too close to the computer!
- Be conscious of how you are framed in your camera. Are you an appropriate distance from the camera? Are you tilted down or up?
- Be conscious of your background. Are you sitting in front of a blank wall like a hostage? Did you leave dirty laundry in the background? Or is your background interesting, clean, and professional?
Once you’ve captured what you need, you can move on to the editing process. During this step, you will be combining all of your materials including the intro, visuals, audio, credits, references, special effects…etc. This is where you will make cuts, move things around, sync your audio and visuals and add annotations. Be patient because this step may take some time, depending on your project.
When you have finished editing and before you publish your work, you can use the following checklist to help you evaluate if you have incorporated the key design principles that have been discussed in this guide. This self-assessment will help you identify the strengths and weaknesses in your video in order to improve your final product.
Keep it Short:
☐ The video is of a reasonable length, ~ 6-8 minutes
☐ There is no repetition
☐ The working memory is not overloaded
Keep it Simple:
☐ Visuals are used optimally (they augment the learning)
☐ Audio is used optimally (it augments the learning)
☐ There are no distractions (background noises, distracting movements…etc)
☐ You are speaking at a reasonable pace (not too fast, not too slow)
Keep it Real:
☐ You demonstrate enthusiasm for the content and a conversational tone
☐ You engage the students by asking them leading questions or reflections
☐ The video is appropriate for your target audience
Keep it Relevant:
☐ Viewers are appropriately situated as to what previous knowledge is required and what the video will cover
☐ The video is aligned with learning and assessment outcomes
☐ The selected design method is appropriate to support the content and learning objectives
Additional Resources
Teaching With Video – Act 1
Teaching With Video – Act 2
References
Borup, J. (2021, February 3). Let’s Discuss Discussions: Using Asynchronous Video to Improve Online Discussions. Educause Review. https://er.educause.edu/blogs/2021/2/lets-discuss-discussions-using-asynchronous-video-to-improve-online-discussions
Borup, J., West, R.E., and Graham, C. R. (2012). “Improving Online Social Presence through Asynchronous Video,” The Internet and Higher Education 15, no. 3.
Brame, C.J. (2015). Effective education videos. Retrieved May 9, 2022 from http://cft.vanderbilt.edu/guides-sub-pages/effective-educational-videos/.
Guo PJ, K.J., and Robin, R. (2014). How video production affects student engagement: An empirical study of MOOC videos. ACM Conference on Learning at Scale (L@S 2014). Retrieved from http://groups.csail.mit.edu/uid/other-pubs/las2014-pguo-engagement.pdf.
Lawson, T. J., Bodle, J. H., Houlette, M. A., & Haubner, R. R. (2006). Guiding questions enhance student learning from educational videos. Teaching of Psychology, 33(1), 31-33. https://doi.org/10.1207/s15328023top3301_7
Lowenthal, P., Borup, J., West, R.E. and Archambault, L. (2020) “Thinking Beyond Zoom: Using Asynchronous Video to Maintain Connection and Engagement during the COVID-19 Pandemic,” Journal of Technology and Teacher Education 28 no. 2: 161–169.
Mayer, R.E and Moreno, R. (2003). Nine ways to reduce cognitive load in multimedia learning. Educational Psychologist 38, 43-52.
Thomsen, A., Bridgstock, R., and Willems C. (2014). ‘Teachers flipping out’ beyond the online lecture: Maximising the educational potential of video. Journal of Learning Design 7, 67-78.